1. Pay Attention to the Light
Good lighting is the single most important thing for good photography. Better lighting means faster shutter speed, which means clearer shots and less blurring. The best light by far is indirect daylight. A shady spot on a sunny day is the holy grail of natural lighting conditions.
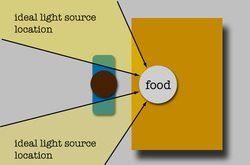
When positioning food, position it so that the light is illuminating the side facing you from a slight angle. The ideal lighting position for a single source light is to have it just off of one of your shoulders. This means that if taking a shot by window light, the window should be behind you, either off to the right or the left (if it's directly behind you, you end up casting a shadow—no good!). If using a spotlight, the center of the light should hit the table in between you and your food slightly to the left or the right of center so that the food is not illuminated directly from above or from behind.
Good lighting is the single most important thing for good photography. Better lighting means faster shutter speed, which means clearer shots and less blurring. The best light by far is indirect daylight. A shady spot on a sunny day is the holy grail of natural lighting conditions.
When positioning food, position it so that the light is illuminating the side facing you from a slight angle. The ideal lighting position for a single source light is to have it just off of one of your shoulders. This means that if taking a shot by window light, the window should be behind you, either off to the right or the left (if it's directly behind you, you end up casting a shadow—no good!). If using a spotlight, the center of the light should hit the table in between you and your food slightly to the left or the right of center so that the food is not illuminated directly from above or from behind.
If there is no spotlight or window light available, get creative. Even a couple of candles can provide enough light to significantly improve your photos. I often carry around a small LED spotlight with me if I know I'm going to be in a particularly dark situation. The kind that fits onto the front of your bicycle (like this one) can be yours for about $20. They are bright, can fit in your pocket, and are great in a pinch.
In rare situations, the light may be too harsh, creating dark shadows or blown-out areas in your photos. This happens, for example, in direct sunlight. In these cases, it's best to cast a shadow either with your body, or a large opaque object (like a napkin.
2. Shoot Multiple Angles and Exposures
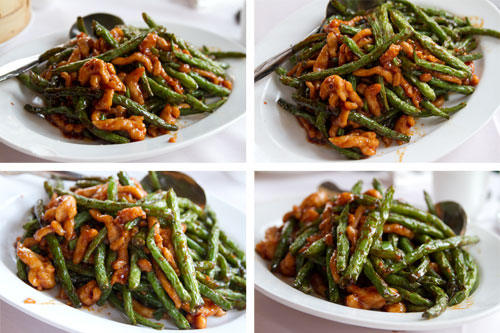
Welcome to the digital world where trial-and-error is OK. As long as you've got a reasonably large memory card, there's no harm in taking a dozen or more photos of the same piece of food. It's usually tough to see how well your shot came out on the tiny camera LCD. Is it perfectly in focus? Is it framed right? Take multiple shots from different angles and at different exposure settings so that you'll have a lot to choose from when you get them onto your computer back home.
Welcome to the digital world where trial-and-error is OK. As long as you've got a reasonably large memory card, there's no harm in taking a dozen or more photos of the same piece of food. It's usually tough to see how well your shot came out on the tiny camera LCD. Is it perfectly in focus? Is it framed right? Take multiple shots from different angles and at different exposure settings so that you'll have a lot to choose from when you get them onto your computer back home.
3. Be Mindful of Your Aperture
In very low light situations, use a large aperture. Large apertures (i.e. small F-stop numbers) shorten shutter speed and therefore blurring, allowing you to take sharper pictures even in dark rooms.
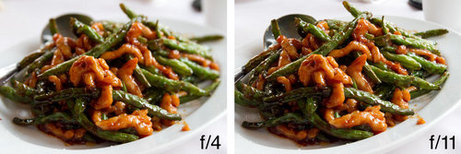
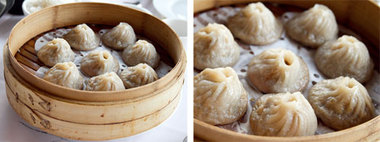
On the other hand, in well lit areas, choose your aperture based on how wide you'd like your depth of field to be. With large aperture settings, your depth of field is very narrow, meaning that things in the far background or foreground will be out of focus, like the plate of beans on the left above. This can be a good thing if you are trying to call attention to a particular detail on a plate—the crust on a burger or the melted strand of cheese on a pizza. Smaller apertures (larger F-stops) will widen your depth of field, allowing you to get both the front and the back of a plate of food in focus all at the same time, like the beans on the right.
For beginners, an F-stop setting of 3.5 to 5 is a pretty good starting range.
In very low light situations, use a large aperture. Large apertures (i.e. small F-stop numbers) shorten shutter speed and therefore blurring, allowing you to take sharper pictures even in dark rooms.
On the other hand, in well lit areas, choose your aperture based on how wide you'd like your depth of field to be. With large aperture settings, your depth of field is very narrow, meaning that things in the far background or foreground will be out of focus, like the plate of beans on the left above. This can be a good thing if you are trying to call attention to a particular detail on a plate—the crust on a burger or the melted strand of cheese on a pizza. Smaller apertures (larger F-stops) will widen your depth of field, allowing you to get both the front and the back of a plate of food in focus all at the same time, like the beans on the right.
For beginners, an F-stop setting of 3.5 to 5 is a pretty good starting range.
4. Adjust the White Balance
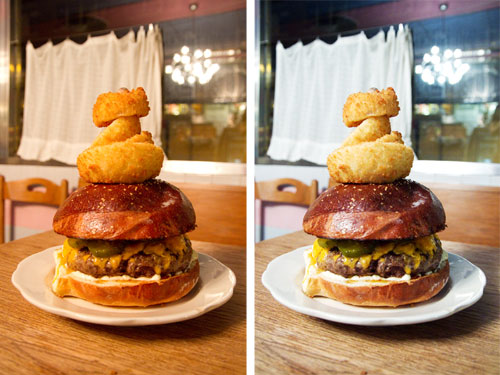
Unadjusted on the left, adjusted on the right
Light in restaurants is often either incandescent or candlelight, both of which are quite yellow. Your eyes compensate for this automatically, but your camera's sensor doesn't. Unless you adjust your white balance, photos will have an odd color cast, like the yellowish burger on the left.
Most cameras have a custom white balance adjustment setting. All you've gotta do is point your camera at a white or gray object, snap a photo, and use it to set your white balance. In a restaurant, this most often means a napkin, plate, or part of a menu. Look at your camera's manual for specific instructions on how to do this with your camera.
Decide whether you want your light source 100% neutral, or if you'd prefer it a little warm. Often, food can appear more appetizing under a very slightly warm orange cast. You never want a blue or green cast on food, which makes it look cold and unappealing.
Avoid multiple light source situations. Multiple light sources can cast different colored lights, which makes adjusting the white balance nearly impossible. For instance, sitting near a window with a blue neon sign outside and a candle/incandescent light inside. No matter what you do, your food will have either a blue or an orange cast to it.
5. Decide whether or not your food will be better served by seeing the whole plate and some context, or just getting nice and tight into a specific part. Either option can be exciting in its own way. At Serious Eats, we tend to lean more heavily towards the latter, but it's up to you.
 RSS Feed